Creating a project schedule is often mistaken for simply listing tasks and assigning dates. In reality, it is the blueprint for execution. Without a robust schedule, even the most talented team will struggle to deliver value on time. A functional schedule accounts for reality, risk, and human capacity. It transforms abstract goals into a tangible roadmap.
This guide details the methodology behind constructing a schedule that survives the pressures of execution. We will focus on the mechanics of time management, dependency mapping, and resource allocation without relying on specific tools. The principles here apply to any environment, from construction to software development.
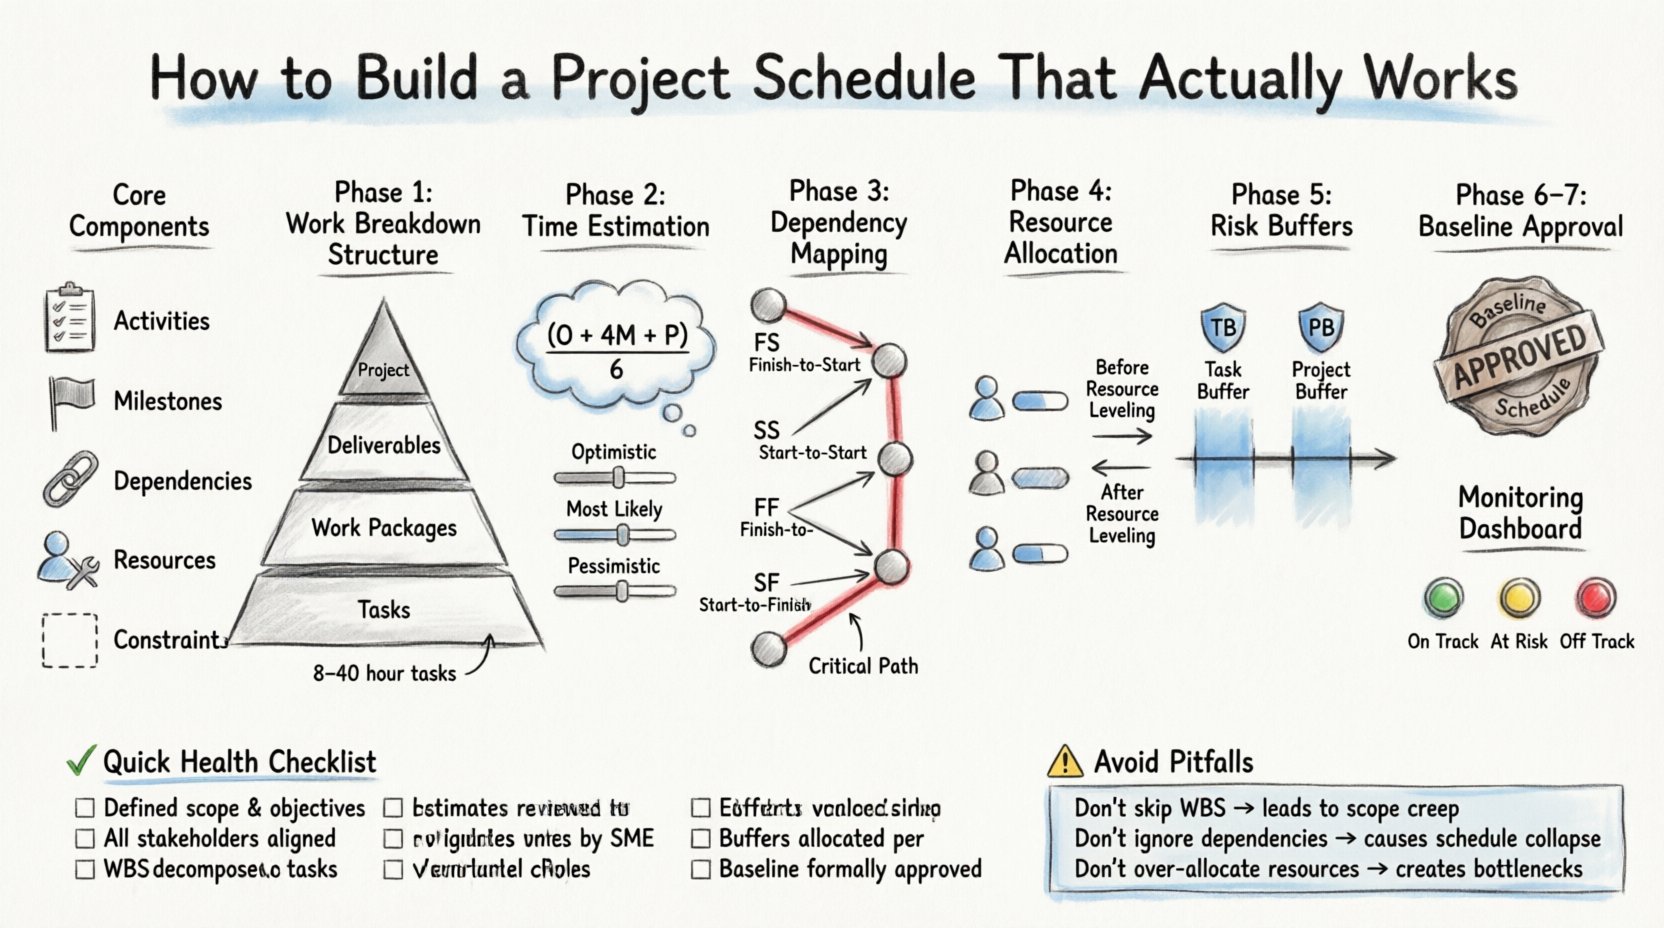
📋 Understanding the Core Components
Before drawing a line on a timeline, you must define the structural elements that make up the schedule. A schedule is not a wish list; it is a logical sequence of events.
Activities: The smallest unit of work that can be planned and tracked.
Milestones: Significant points in time that mark the completion of a phase or deliverable.
Dependencies: The relationships that dictate the order of work.
Resources: The people, equipment, and budget required to complete activities.
Constraints: Limitations imposed by the environment, such as fixed deadlines or regulatory requirements.
When these components are integrated correctly, the schedule becomes a predictive model rather than a static document.
🔍 Phase 1: Defining Scope and Work Breakdown
The foundation of any accurate schedule is a clear definition of scope. If the work is not defined, the time cannot be estimated. This process begins with the Work Breakdown Structure (WBS).
1.1 Decomposing the Project
Decomposition involves breaking the project down into manageable chunks. This hierarchy ensures nothing is overlooked. A common pitfall is stopping the decomposition too early.
Level 1: The Project itself.
Level 2: Major Deliverables or Phases.
Level 3: Control Accounts or Work Packages.
Level 4: Individual Tasks.
Tasks at the lowest level should ideally take no more than 8 to 40 hours to complete. If a task is too large, it is difficult to estimate accurately. Large tasks hide risks and allow progress to stall without immediate detection.
1.2 Identifying Deliverables
Every task must have a clear output. Ask yourself: “What is the tangible result of this work?” If the answer is vague, the schedule will suffer. Specificity in deliverables allows for objective progress tracking.
Bad: “Research topic.”
Good: “Draft research summary document (2 pages).”
⏱️ Phase 2: Time Estimation Techniques
Estimating duration is the most critical and often the most error-prone step. Optimism bias often leads to schedules that are too aggressive. To mitigate this, use structured estimation methods.
2.1 Three-Point Estimation
This technique considers uncertainty by asking for three values for each task:
Optimistic (O): The best-case scenario where everything goes right.
Pessimistic (P): The worst-case scenario where significant obstacles arise.
Most Likely (M): The realistic expectation based on experience.
By calculating a weighted average, you account for risk. The formula typically used is:
(O + 4M + P) / 6
This provides a statistically more accurate duration than a single guess. It forces the team to acknowledge that things can go wrong.
2.2 Historical Data Analysis
If the organization has completed similar projects, use that data. Look at the actual time spent on comparable tasks in the past. Past performance is the best predictor of future performance, provided the context is similar.
2.3 Expert Judgment
Consult the people who will actually do the work. They understand the nuances of the tasks better than anyone. Do not rely solely on management estimates. The person writing the code or installing the equipment knows the effort required.
🔗 Phase 3: Mapping Dependencies
Tasks do not exist in a vacuum. They are linked. Understanding how one task affects another is essential for the Critical Path Method (CPM).
3.1 Types of Dependencies
There are four standard types of logical relationships between tasks:
Type | Abbreviation | Description | Example |
|---|---|---|---|
Finish-to-Start (FS) | FS | Task B cannot start until Task A finishes. | Coding must finish before Testing starts. |
Start-to-Start (SS) | SS | Task B cannot start until Task A starts. | Writing and Editing can start simultaneously. |
Finish-to-Finish (FF) | FF | Task B cannot finish until Task A finishes. | Documentation must finish when the product finishes. |
Start-to-Finish (SF) | SF | Task B cannot finish until Task A starts. | Shift handover (New shift starts, old shift finishes). |
3.2 Identifying the Critical Path
The Critical Path is the longest sequence of dependent tasks in the project. It determines the shortest possible duration for the entire project. If a task on the critical path is delayed, the project end date is delayed.
Zero Float: Tasks on the critical path have zero slack. Any delay impacts the deadline.
Monitoring: These tasks require the highest level of oversight.
Compression: To shorten the schedule, you must shorten tasks on the critical path.
Non-critical tasks have “float” or “slack.” This is the amount of time a task can be delayed without delaying the project. Managing float allows for flexibility in resource allocation.
👥 Phase 4: Resource Allocation and Leveling
A schedule with time but no resources is theoretical. You must assign capacity to the tasks.
4.1 Assessing Capacity
Not all resources are available 100% of the time. Consider:
Vacations and Leave: Planned absences must be excluded from available hours.
Administrative Time: Meetings and emails take up productive time.
Multi-tasking: If a resource is split across multiple projects, their efficiency decreases.
4.2 Resource Leveling
Resource leveling is the process of adjusting the schedule to match resource availability. If a team member is over-allocated (assigned more work than they can physically do), you must adjust the dates.
There are two approaches to resolving over-allocation:
Extend Duration: Allow the task to take longer so the resource can handle it.
Assign Additional Resources: Bring in help to share the load.
Ignoring over-allocation leads to burnout and missed deadlines. A realistic schedule respects human limits.
🛡️ Phase 5: Risk Management and Buffers
Uncertainty is inherent in all projects. Buffers are time reserves added to protect the schedule from unexpected events.
5.1 Task-Level Buffers
Some teams add a contingency percentage to individual task estimates. For example, adding 10% to a 10-day task makes it 11 days. This is simple but can lead to “Student Syndrome,” where work starts at the last minute because the buffer is perceived as padding.
5.2 Project-Level Buffers
A project buffer is placed at the end of the critical path. It absorbs delays from multiple tasks without affecting the final delivery date. This is a more robust approach for complex projects.
5.3 Risk Register Integration
High-risk tasks should have specific mitigation plans. If a risk materializes, the schedule must be adjusted immediately. The schedule should not be static; it is a living document.
Identify Risks: What could go wrong?
Probability & Impact: How likely is it, and how bad would it be?
Response Plan: What do we do if it happens?
📊 Phase 6: Baseline and Approval
Once the schedule is drafted, it must be reviewed and approved. This creates a “Baseline.” The baseline is the original plan against which actual performance is measured.
6.1 Stakeholder Review
Show the schedule to stakeholders. Explain the logic, the critical path, and the assumptions. If stakeholders do not understand the schedule, they cannot support it.
Clarify Assumptions: State clearly what you assumed to be true (e.g., “This assumes vendor delivery is on time.”).
Set Expectations: Ensure everyone agrees on what constitutes “done.”
Sign-off: Formal approval indicates commitment to the timeline.
6.2 The Baseline Record
Once approved, save this version as the baseline. Do not overwrite it when changes occur. Changes should be tracked as variances against the baseline. This allows for accurate performance analysis later.
🔄 Phase 7: Monitoring and Control
The schedule is useless if it is not maintained. Regular tracking ensures that deviations are caught early.
7.1 Progress Tracking
Update the schedule frequently. Weekly updates are standard. For each task, record the percentage complete or the actual start and finish dates.
Actual vs. Planned: Compare the baseline dates with actual dates.
Variance Analysis: Calculate the difference. Is the delay impacting the critical path?
7.2 Change Management
Scope creep is the enemy of the schedule. If new tasks are added, the schedule must be recalculated. Do not just add tasks to the end; re-evaluate the dependencies.
Use a formal change request process. If a change is approved, update the baseline or create a new baseline version to track the deviation.
7.3 Communication Protocols
Information must flow up and down the chain. If a task is delayed, the team must know. If a task is ahead, the team can optimize resources.
Dashboard: Visual representation of status (Green/Yellow/Red).
Meetings: Regular stand-ups or status meetings focused on schedule health.
Reports: Weekly summaries highlighting key risks and upcoming milestones.
⚠️ Common Pitfalls to Avoid
Even with a solid plan, mistakes happen. Be aware of these common errors.
Missing Dependencies: Failing to link tasks that rely on each other.
Ignoring Holidays: Scheduling work on non-working days.
Over-optimism: Estimating based on best-case scenarios only.
Static Planning: Treating the schedule as a finished document rather than a tool.
Lack of Visibility: Keeping the schedule in a silo where only one person can see it.
📝 Checklist for Schedule Health
Use this checklist to validate your schedule before execution begins.
☐ All tasks are defined at the work package level.
☐ Dependencies are logical and necessary.
☐ Resources are assigned and available.
☐ The critical path is identified and understood.
☐ Buffers are included for high-risk areas.
☐ The baseline is saved and approved.
☐ A review cadence is established (e.g., weekly).
🚀 Final Considerations
A project schedule is a tool for communication and control, not a guarantee of the future. It provides the structure needed to navigate uncertainty. By focusing on scope definition, realistic estimation, and dependency mapping, you build a schedule that supports delivery.
The goal is not perfection; it is predictability. When the plan aligns with reality, the team can focus on execution. When the plan ignores reality, the team wastes time fixing the process. Invest the time upfront to get the schedule right. It pays dividends throughout the lifecycle of the project.